Kamis, 14 November 2013

Cara blokir situs menggunakan MIKROTIK


Cara mudah Blok Situs menggunakan Mikrotik sebagai berikut:


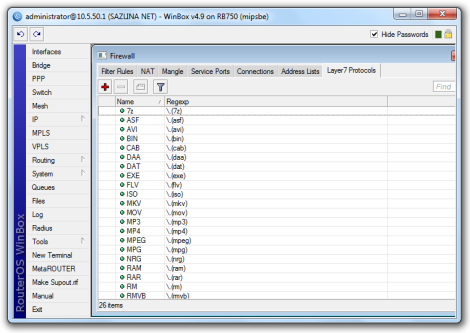
Remote Mikrotik anda dengan Winbox, di halaman utama Winbox pilih “IP” kemudian “Firewall” kemudian “Layer7 Protocols” dan klik + seperti gambar di bawah ini:
Cara Blok Situs Menggunakan Mikrotik

Rabu, 03 Juli 2013

Membuat "Recycle bin" pada Samba4

Kehilangan data saat file yang ada di “sharing data” samba terhapus?, solusinya adalah dengan cara membuat  Recycle bin, agar file yang dihapus tidak langsung hilang tapi akan ada di Recycle bin.

Berikut ini langkah-langkahnya :
1. Tambahkan konfigurasi berikut pada konfigurasi bagian file sharing di berkas smb.conf
[share]
        path = /data
        comment = Sharing Data
        read only = no
        browseable = yes
        writeable = yes
        guest ok = yes

        vfs object = recycle
        config file = /usr/local/samba/etc/recycle.conf
        recycle:repository = Recycle Bin
        recycle:keeptree = Yes
        recycle:versions = Yes
2. Buat berkas konfigurasinya :
# vi /usr/local/samba/etc/recycle.conf
name = Recycle Bin
mode = KEEP_DIRECTORIES|VERSIONS|TOUCH
maxsize = 0
exclude = *.tmp|*.temp|*.o|*.obj|~$*|*.~??|*.log|*.trace
excludedir = /tmp|/temp|/cache
noversions = *.doc|*.ppt|*.dat|*.ini|*.xls|*.pdf
3. Setelah selesai silakan restart samba
4. Test dengan menghapus file yang ada pada folder sharing “share”, maka akan muncul folder “Recycle Bin”
Noted : 
Pada link referensi tersebut, jika kita salin tempel konfigurasi “smb.conf ” nya, maka akan muncul error saat samba start :
smbd: Ignoring unknown parameter "config-file"
Kesimpulannya adalah pada samba4 parameter “config-file” tidak ada, yang ada adalah “config file”.

Selasa, 02 Juli 2013

Zimbra 8 - automatic backup & restore via script

Some longer time I announced here my plan to make my mail server failsafe. I went for a rather simple approach, because I use Zimbra 8 Open Source Edition.
Every night a make a backup of the mailboxes on server 1 and import them to server 2.
I wrote two bash scripts. One runs, invoked by a daily cronjob in context of the root user, on the primary mail server and creates a backup of all mailboxes. Which mailboxes should be backed up is defined in a text file (this file is parsed with:while read). The command for backing up and restoring mailboxes is 'zmmailbox'.
Example: zmmailbox -z -m user@domain.com getRestURL "//?fmt=zip" > /home/zmbackup/user@domain.com.zip"
At the end of the script the zipped files are rsynced to the secondary mail server. The rsync runs in the context of another user, which is only allowed to run rsync on the backup mail server and authenticates with a passwordless ssh key.
Then, on the second host, another bash script starts which restores the backups. It starts one hour later than the backup script on the primary host, to make sure that backup and rsync on the primary server have finished.
Example: zmmailbox -z -m user@domain.com postRestURL "//?fmt=zip&resolve=reset"/home/zmrestore/user@domain.com.zip
At the beginning of the first and at the end of the second bash script the zip files are deleted, no to flood my disk with backups.

Kamis, 28 Februari 2013

Mount remote ftp directory host locally into linux filesystem

1. Installation
2. Mount ftp directory
3. Mount ftp with curlftpfs using /etc/fstab

Do you often access your ftp site to make some simple changes or your share some documents that you wish to be accessible from anywhere.
You can make your access to your ftp resource easier with curlftpfs linux utility. This fantastic utility allows you to mount your ftp site to any directory withing your linux filesystem.

1. Installation

First install curlftpfs package. On Debian or Ubuntu it would simple as:
apt-get install curlftpfs

2. Mount ftp directory

What needs to be done next is to create a mount point:
# mkdir /mnt/my_ftp
next use curlftpfs to mount your remote ftp site. Suppose my access credentials are as follows:
  • username: ftp-user
  • password: ftp-pass
  • host/IP: my-ftp-location.local
the actual curlftpfs mount command would be:
# curlftpfs ftp-user:ftp-pass@my-ftp-location.local /mnt/my_ftp/
Caution:
ftp uses unencrypted passwords so anyone can intercept your password without much effort. Therefore use curlftpfs in combination with SSL certificates if your are not mounting some local LAN ftp server.
On Debian you can mount ftp using curlftpfs as a root and this allows only root user to access ftp mount.  No other users are allowed since by default only users that mounts has and access to mount directory. When mounting ftp as a non-root user you may get a following error message:
fuse: failed to open /dev/fuse: Permission denied
Rather that changing permissions of /dev/fuse you can allow other users to access ftp mount directory with an curlftpfs's option allow_other. The command will look similar to the one below:
# curlftpfs -o allow_other ftp-user:ftp-pass@my-ftp-location.local /mnt/my_ftp/

3. Mount ftp with curlftpfs using /etc/fstab

Since we do not want put any passwords to /etc/fstab file we will first create a /root/.netrc file with a ftp username and password using this format:
machine my-ftp-location.local
login ftp-user
password ftp-pass
Now change permissions of this file to 600:
# chmod 600 /root/.netrc
Check uid and gid of your non-root user. This user will have a access to ftp mount directory:
$ id
In the next step add a following line to your /etc/fstab file ( change credentials for your ftp user ):
curlftpfs#my-ftp-location.local /mnt/my_ftp fuse allow_other,uid=1000,gid=1000,umask=0022 0 0
Now mount ftp with:
mount -a

http://linuxconfig.org